Flushing a membrane is part of the regular maintenance you should be carrying out on your RO/DI Purification system to ensure it runs efficiently.
Flushing an RO membrane can extend its lifespan, and though each system is going to have a slightly different method, most purification systems require you to follow a fairly simple process as follows:
If you have just purchased your purification system, be sure to flush it for approximately 30 minutes to remove any residue or build up in the system from storage/manufacture.
Here is what you will need to do:
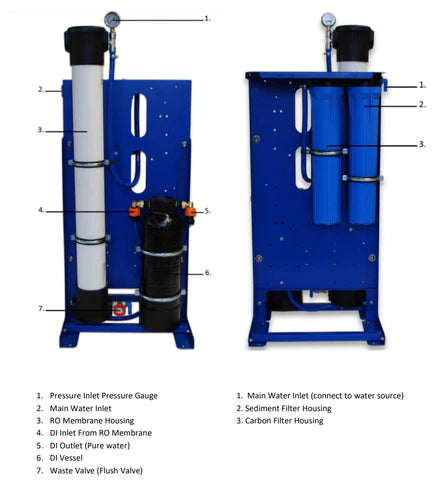
1. Connect a water source to water input. Usually, this will lead directly into the sediment filter housing. Commonly, this is either a standard garden HozeLock type connector, or a hose tail to simply sleeve the hose over.
2. Connect any necessary hoses to your waste outlet and lead the hose into a drain or gutter.
3. Locate the RO Membrane Housing. This is generally the largest component and either housed in plastic or stainless steel.
4. Locate the waste valve. If you are using a FaceLift Static or van mounted RO/DI System, this is located at the base of the membrane housing and will be red- handled red waste water valve. Turn the waste valve anticlockwise fully to open the valve and set the system to flush (see diagram below).
5. Turn on your water source and leave to run for 30 minutes. You will quickly be able to determine if the system is backflushing as the water will all be coming from the waste, this system should not be producing pure water.
5. After thirty minutes, turn the valve fully clockwise to close the valve and the system will now begin to produce pure water.
You're all set, your system is flushed and ready to produce pure water!


